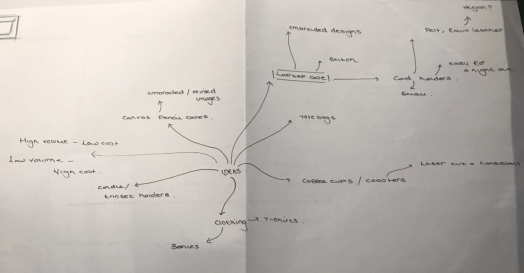
SALES DAY:

SALES DAY: 


On Tuesday 11th February our sales event took place; this was incredibly exciting and nerve- wracking. The night before we had set up our stand ready for the next morning so that we could get straight into business; this made the start of the day easier. Once we arrived we laid out all of the laptop sleeves in an aesthetically pleasing way to make our stand look inviting and attractive. Every member of the team was in at 9:00am which enabled us to set up the stand as well as the card machine before customers started approaching our stall. We decided that it was important to have a card machine available on sales day as not many people often carry cash around now days so it would be more beneficial and enable us to obtain more sales. The only problem that we found with having a card machine in the CSAD building was that the signal failed multiple times which meant that the transactions didn’t go through. Although this was annoying  the customer were incredibly patient and considerate and waited for the transaction to go through.

funny photo

During the day we took it in turns to man the stall. As a collective we thought it was incredibly important to greet customers with a warm and welcoming personality and explain the story behind the production of our unique and contemporary laptop sleeves. During this explanation we offered them the ability to personalise the buttons which are used to securely hold the flap down; the majority of people who bought a laptop sleeve wanted it to be personalised. These buttons were produced on the laser cutter to order and were then sewn on at the stall; this approximately took 20 minutes to complete and therefore the customers were told to come back later on the day to pick their laptop sleeve up. Aidan and Eva were in charge of using the laser cutter as they were both inducted in it; once we had collected 5/6 sleeves which required personalised buttons they went to the soft modelling studio and etched out the names required for the orders.

personalised buttons

LAPTOP SLEEVE PRICES:

PRICE= 13” – £10    15″ – £12

PERSONALISED BUTTON= £1

One thing which I noticed on the day of the sales event was that the customers which bought our laptop sleeves were not just students. At the start of the project we decided that our target market was made up of young extroverted students as we believed that they were most likely to by a laptop sleeves which is made up of bright bold and neon colours. However the sales day showed that a wide variety of individuals who bought our product were of a variety of different ages therefore implying that our laptop sleeves are perfect for everyone.

I have thoroughly enjoyed this project and I am incredibly happy I chose it for this terms module. I have made friends/ connections with people from a variety of different disciplines which will potentially be useful in the future. I have learned so many new skills which I can take back and use for my projects within interior design and into the future as my art and design career progresses.

team photo


team photo

EVALUATION:

Mind Your Own Business has been filled with experience, stress, laughter and creativity. It has been a whirlwind of emotions and has provided me with a voice I didn’t think I had. Working in a creative collective with a variety of like-minded individuals all of whom came from a variety of different disciplines was incredibly interesting and allowed our group to be filled with a vast amount of creative, unique and extraordinary ideas. Although working in a group was exciting and enabled me to make new friends and connections within the CSAD building it also had its flaws. For a group project to be successful everyone needs to be committed, passionate and motivated to achieve an end goal; I found that one person within the group didn’t pull their weight which was incredibly frustrating and annoying.

However, this did not let the rest of the group lose their passion for the project, it increased our motivation to work as hard as we possibly could to obtain the result, we believed we deserved. Being a part of the business Consilio has allowed me to gain additional skills and experience which I can take back and potentially use for my interior design career in the future. I had never used a sewing machine properly or used materials such as bonder webbing to attach different materials together.

This was all new to me and scary at the time as I was worried my lack of experience would let the group down. Harleigh (textiles student) and Daria (Fashion Student) had experience within this field and showed me how to complete the processes required to make the laptop sleeves. My main job was to carefully cut out each material and bond them together using the steam iron and sheets of bonder webbing. Later, in the production process, I was also given the task of sewing the personalised buttons onto the cases. I thoroughly enjoyed learning new skills and was fascinated by the processes required to bond materials together in an easy and efficient way.

In addition, I was given the important job of taking care of the finance for this project; I volunteered to take care of this job as I believe I am incredibly efficient and sensible when it comes to spending money and can easily make excel spreadsheets which can record Consilio’s expenditure and profits. As the project progressed, I become more and more comfortable in the processes required to take place within the development of our business. At times we felt as though the production of our laptop sleeves was not correct as they were not being produced to the quality we required. This meant that there were multiple times within the 5-week project where we had to go back to the drawing board and re-design the sleeve to make it easier to make and to increase its aesthetic appearance. Although this was incredibly frustrating it provided us with several prototypes and allowed us to show the development of our product as the weeks went on; this made selling the finalised laptop sleeve incredibly personal due to the amount of hard work which went into the creation of the product.

buttons 4

WEEK 4 – Production

DEVELOPMENT OF MYOB LAPTOP SLEEVES: 


This week was slightly more positive, we were donated large amounts of leather from the fashion studio. This leather was of a high quality and came in a variety of different colours and textures; thus enabling us to produce a selection of unique and contemporary laptop sleeves. This meant that we were able to spend more money on the lining of the laptop sleeves and potentially make more than we predicted. Over the weekend we discussed how we could put together the materials to create the laptop sleeves in a way which is easier and produces an end result which is more aesthetically pleasing and of a higher quality.


MATERIALS: materials


As a group we collectively decided that we would stitch a pocked onto the felt lining before it is attached to the leather – this will mean that the pocket stitching will not be seen through the back of the product making it look more professional. To make the pocket different we will stitch a tiny bit of leather onto the pocket and attach a swivel clasp so that the customers can safely and securely place there memory stick or student card there. This was something we always wanted to include within our product since the beginning of the project as we all realised that memory sticks can easily be lost and therefore by having them in a designated place they are more likely to be kept safe.


LAPTOP WITH COVER ON   SWIVEL CLASP


Once the pocket had been stitched onto the felt lining ,the faux leather cover could be stitched on using the industrial sewing machines. Before the sleeves were finished the overlocked flap was stitched on again using the industrial machines. My main jobs within the production of our product was to efficiently cut out the sheets of material required to produce each individual laptop sleeve as well as bonding the materials together using the steam iron. As these sections required a large amount of precision I needed to ensure that I cut out each section accurately as the sleeves could look un-professional if they were not cut properly.


cutting materials   sewing materials

overlocking


Whilst myself, Harleigh and Daria were in full production of the laptop sleeves, Aidan and Eva were creating the acrylic buttons with our logo on which will be stitched to the finalised laptop sleeve on sales day. In addition, they also were creating the packaging and stand for the sales event. I Believe that as a group we have worked incredibly well together and when assigned a particular task we did it to the best of our ability.


BUTTONS   BUTTONS 3


Week 3 – DAY 2

LAPTOP SLEEVE DEVELOPMENT – PROBLEMS:


Towards the end of the week, we experimented with using the bonder web to attach the 2 materials together. For the materials to be bonded together with the webbing needed to be activated by heating and being pressed by an iron; thus ensuring that the glue within the webbing melted and allowed the 2 opposing materials to be joined. We realised that this process was the easiest and most efficient way to produce the laptop sleeves in the time frame allocated. As an interior design student, I had little to no experience with processes associated with textiles and therefore, I found it incredibly interesting learning how these are completed. Once I had got the hang of bonding the materials together I decided that this was the perfect role for me within the group.

BONDER WEBBING  HEATING PROCESS: 


bonder webbing


Within this week we produced our first prototype of the laptop sleeve. The outcome was not what we hoped and we were disappointed in the quality of the product, this was because it looked messy, un-aesthetically pleasing and would not be suitable for its purpose. This meant that we had to go back to the drawing board and come up with a design which would be more efficient and increase the likelihood of the product being produced to a higher quality/standard. Alongside the problems with the aesthetic of the product we also realised that the lid/flap for the case was too bulky and looked out of place; therefore downgrading the aesthetic of the sleeve further. As a group we decided that the sleeve would look better with a smaller flap which was thinner; by doing this the sleeve looked less bulky and was far easier to hold and carry. Another problem which we endured was the quality of the leather we ordered from amazon. The pleather was incredibly thin and the white leather, in particular, suffered a large amount of discolouring which decreased the aesthetic of the prototype.

This week was particularly stressful as the production of the sleeves was considerably slow due to the number of problems which we faced. I felt as though we were not going anyway and it seemed the countdown to the sales day and presentation pitch were creeping up incredibly quickly.


prototype   prototype x 2


Week 3 – Day 1 – MYOB

Week 3 was incredibly intense as the production for our products needed to be underway. All of our materials were ordered off of amazon prime, however, when they arrived they were not the correct thickness…. which was a big problem. At first we were incredibly stressed as this was something which we didn’t want to happen, however after speaking with Maggie (the textiles tech dem) we came up with a few ideas which we could experiment with to try and solve the problem.


Material arrival:


Material images

Maggie suggested using bonder webbing to attach the pleather to the felt to increase the hardness and durability of the pleather we were using. As an interior design student I have not got much knowledge in textile based activities; however, I was incredibly interested to learn and expand my knowledge within this field. In order to attach the felt to the pleather we heated the bonder webbing by using an iron to press the materials together. I learned that as the bonder webbing is heated the material makes a sort of gluey substance which allows the 2 different materials to stick together… creating a very strong bond. Learning that this process was possible enabled us to use the materials we had ordered and not put them to waste. In addition to bonding the materials we started to digitally stitch our logo onto our workwear; again I have not done this before and was interested in how the process works. Harleigh and Daria are textile and fashion design students and are trained to use the stitch machines; due to their experience with digital stitch  they were able to efficiently tell me how the process works and allowed me to be involved within the making of the logos. Each logo was stitched with a different colour to represent all of the individuals within the company and their personality. (The colour which I had chosen as my colour was bright pink)  By the end of the day all 6 t-shirts had been digitally stitched with our logo on them ready for sales day and our presentation.


DIGITALLY STITCHED LOGO:


digital stitch

Alongside sorting out the materials Aidan (our Graphic Designer) had been to the print studio and got our finalised business cards printed. To enhance the aesthetic of the business card he also created some black card holders which wrap around the business card – these will be laser cut with our strapline “it’s a cover up” on them to provide an edgy and stylish look. Tuesday was a very busy day for everyone in our group; one of the other tasks we did that day was to print our graphic posters advertising our company and then put them up around the whole university. The posters which we decided to use were the ones which I had created- the pattern I used for the background of the poster was created by Aidan (we all agreed that this paint brush design perfectly suited our brand) which provided a contemporary and attractive look to our posters and made them interesting and intriguing. I placed the posters around the majority of the university blocks and ensured that they were put in places where people can easily see and read them- this is incredibly important to ensure that the posters are legible.


BUSINESS CARDS:


Buisness card Back of buisness card


CONSILIO POSTERS:


CONSILIO- poster x2     CONSILIO- posters

consilio poster


WEEK 2 – MYOB – feedback and development

PROJECT DEVELOPMENT:


On Thursday we presented our final idea to the other groups within the MYOB project, this enabled us to obtain feedback about our designs and if there was anything we could do to enhance our companies advertisement or final product design. The feedback we were given was incredibly beneficial, one main point which we were given was that at first glance our logo looked like a company of whom produced makeup products. This was due to the fact that we had used a brush effect on logo. We then discussed how we could change the logo to make it more appropriate to our bespoke laptop sleeve business. Aiden our graphic designer came up with a contemporary piece of abstract art; incorporating the brush strokes to make our logo stand out but not look like a makeup brand.


BEFORE FEEDBACK:


First laptop sleeve


AFTER FEEDBACK:


business card


Another piece of feedback that we obtained was to consider producing an attachment for your laptop charger. This was something we had been considering since the start but we prevented by not having a large enough budget. We considered using the scrap felt which we had obtained for free from the textiles studio but were unsure if this would provide the casing with enough protection. Over the weekend and during next week we will be experimenting with materials to see if they will be suitable enough for our laptop sleeves. During last terms field project (Interior Styling) there was an abundance of different materials which were left over from the donations they received. We used this opportunity to ask if we could use some of the left over material and we were given permission to use them. This enabled us to create a mock up of our laptop sleeve design using left over felt, thus allowing us to gain a better understanding of how we should attach the materials together to create the perfect laptop case. Although the felt was not thick enough it provided us with a rough idea of the layout we want to produce for our final design. In order to ensure that we start the making process as soon as possible I ordered samples of potential pleather fabric which we will be using for the laptop sleeves. I ordered them off of amazon prime which meant that they would come asap to give us enough time to discuss whether the material is suitable for the production of our product.

Alongside creating mock ups of our products we also discussed how we wanted to display our products on the sales event. As an interior design student I decided to use my skills on SketchUp to design a potential object display set up. As we only have a budget of £100 we needed to make sure that the display space was produced at a very little cost; I decided to have a look around charity shops and car boot sales for cheap stands which could potentially be used. I have still not found anything which will be suitable but I intend to continue looking for suitable stands which will be appropriate for the display of our laptop sleeves.


MOCK UP LAPTOP SLEEVES:


mock up laptop sleeves

mock up laptop sleeve x2


Week 2 – MYOB – Elevator Pitch

ELEVATOR PITCH:


As part of our MYOB project each group had to complete an elevator pitch. This term was something I had never heard before however, after Richard explained what occurred within the elevator pitch I understood its importance. In order to pitch your business effectively and efficiently to an employer you need to be sharp, accurate and precise in the description of your business. Being clear, unambiguous and direct is incredibly important to ensure that the businesses motives and goals are correctly understood.

The elevator pitch would last approximately 17.8 seconds; this was the amount of time it took to go from the ground floor to the third floor in the CSAD building. At first I didn’t think that their would be enough time to successfully describe our business however, after practising the pitch I realised that it was more than enough time to provide a direct and crisp description of our company. As a team we collectively decided that only one person should do the speaking within the elevator pitch; reducing the possibility of multiple mistakes made. I volunteered to speak as I have completed pitches in previous projects as part of my interior design assessments.  In the days leading up to the elevator pitch we discussed how we would best describe our business, ensuring that we included who are target market is, our values and of course the product we will be designing, producing and marketing.

Elevator pitch


Our finalised pitch can be seen below:


“WHO THE HELL ARE WE!”- Said by Harleigh

“Consilio, a company that creates bespoke laptop sleeves – ‘IT’S A COVER UP’ We pride ourselves by giving you the freedom to be YOU, with our quirky, extrovert designs.” – Said by Me

“MADE FOR YOU THE STUDENT” – Said by Me

Aiden hands Richard our Mock Up business card.

Harleigh hands Richard our badge and says “Wear it with pride” ( as the doors of the elevator opened”

BUISNESS CARD:

business card


 FEEDBACK:


The elevator pitch went really well and we managed to complete it within 16 seconds and also had enough time to give Richard our business card which had details of our contact details and social media pages. The feedback we got from this pitch was incredibly good and Richard said that our use of splitting up the pitch was very successful. We decided that another person within our group should start the pitch by asking the question “who the hell are we?” thus ,causing an unexpected turn in the pitch rather than the whole pitch being dictated by myself. This provided the pitch with additional elevation making it more interesting and rememberable.


Presentation:


On Tuesday 21st we had a presentation on how to make a successful business canvas model. I had never heard of this model before and was intrigued as to what it depicted. Presentations like these are essential as they can provide me with skills which I could potentially require for future projects or if I create my own business in my future career.

The Business Canvas Model is a model that helps people understand the different areas within you business. These can include key partners (The people or companies that your company is working with or alongside) or Key activities which makes your company professional e.g. Quality control of products and manufacture. I learned that these models are useful to differentiate the different processes which take place within the business and enables you to allocate specific traits of that activity; thus making it easier to produce a business plan.

Buisness canvas model


DAY 2- myob- field term 2


As a creative collective team we had been discussing and sharing our initial ideas over our group chat following our first meeting of the mind your own business course. We discussed our client personas in order to obtain a better understanding of who we would be designing, producing and marketing our products too. Collectively we decided that our products would be aimed at students in particular therefore, we need to ensure that our  laptop sleeves are on trend, stylish, unique and of a high standard and quality.

Once we had decided on our ideal target market/clientele we started to  individually create personal persona’s which would perfectly depict the client we are marketing our products too. It was incredibly interesting to see peoples interpretations of how they would best describe a student; although the majority of our ideas were similar there were a few sections which were slightly different. Although we came across these differences we decided to include them within the final client persona profile as we realised that no one student is the same. Alongside creating individual personas we also decided to each create 2 mood boards which described the theme which we believed best suited our target market. Again this was incredibly interesting as we all created a variety of different mood boards which depicted a variety of different themes and styles. We then discussed the possibility of combining the different ideas into our designs. For example, I decided to use quite neutral and greyish tones within my mood board whereas both Harleigh and Daria used bright neon and bold colours. Therefore, in order to compromise we agreed that using a combination of grey neutral colours and contrasting them with bright bold patterns would produce a stylish and aesthetically pleasing laptop sleeve.

Next on the agenda for our group was to come up with a brand name! Initially we were  incredibly quiet whilst we thought of potential ideas. To help us understand the importance of brand names and straplines Richard our lecturer informed us that our brand name must be catchy, simple and efficiently explain what you are selling. We then started to throw out a few ideas including:

  • Hip Design
  • Luxsit
  • Infocus
  • BrighterBee
  • Progresso
  • Consilio ( This means “Design” In Latin)

Initially we really like the name Infocus as we believed that it linked well with our values as a group; implying that we are passionate, motivated and focused on producing high quality products. As a brand name this was quite catchy and interesting however, we were still incredibly unsure on whether it was suitable for the final brand name. We then looked into the name Consilio – I personally liked this name a lot and I believed that it had a nice ring to it and was incredibly stylish and unique. Instead of finalising our brand name we decided to design a few different logos with the different names we had suggested. This then allowed us to effectively chose a brand name which perfectly suited our aims and products.


OUR MYOB GROUP CHAT :

This shows a few inital ideas that we had come up with for potential logos and names.


Myob group chat

DAY 1 – Mind Your Own Business

Meeting my MYOB team:


I was incredibly excited to start my term 2 field project and was looking forward to meeting and working with individuals from different disciplines. During the first 30 minutes of the session I met my business “family” and was introduced to the aim of the field project.

The brief for this project is to design, make, brand and market a product as a creative collective team. Each group will be given £100 as a ‘seed’ fund which will help enable the business module to successfully take place. As part of the project we had to elect someone within the group to become the financial adviser and take care of the amount of money we spend on materials. I was chosen to do this as I have experience in handling money; as well as being able to efficiently use Word excel to document the amount we spend on materials and our overall profit. One we had elected roles to each member of the creative team we were advised to come up with 5 different values which defined us as a team and what we expect each member to abide by throughout this project.

Work


Our Agreed Creative Collective Values:


  1. Accountability– Each team member must pull their own weight within the project and be responsible for downfalls which may be caused by their inability to commit to the project.
  2. Diversity – We want our product to be universal and for their to be something for everyone; both male and female and for a variety of different age generations.
  3. Passion– Each team member needs to be motivated, passionate and committed to the project in order for us to succesfully produce a good quality product.
  4. Teamwork– In order for our creative collective team to work efficently and successfully throughout this project we need to be gelled and respect each individuals ideas.
  5. Creativity – As a team we will design a selection of products which are aesthetically pleasing, unique, stylish and on trend.

KEY TERMINOLOGY: 

I have never completed a business course before and therefore, the lectures taught me some new terminology. As an interior design student and an A level Product design student I knew how to design products or spaces which are perfectly suited to the needs and requirements of the target market/cliental. However, I learned about the different marketing methods which are used when designing and selling a product for certain target markets.

Mass Marketing– (undifferentiated) = business target the WHOLE market. In order to succeed and sell vast quantities of their products their designs are tailored to what customers need, require and WANT!!!!!

Segmented Marketing- (differentiated) = target several market segments within the same market. This means that the consumers are segmented into different groups which they have common interests with.

Concentrated- (niche) – Business focus narrowly on smaller segments. This includes companies such as Oatley and Holland and Barrett.


PROJECT DISCUSSIONS:

I have always believed that the key to successful projects is hard work and my team members thought the same. Therefore, in order to start the project off well we decided to create a mind map of different ideas which we could possibly develop further. We then discussed what we would buy if the roles reversed and we were potentially buying a product. After a long discussion we collectively decided to design and make laptop sleeves for uni students and lectures. This is because a large proportion of students have laptops and ipads for their courses and we believed that individuals would buy a unique sleeve. To communicate with each other we created a Facebook group chat where we can share our ideas and designs we have created when we have not been into uni. This allows us to constantly be connected.

mind map

Design a site like this with WordPress.com
Get started