‘a place to exist’ – Sketchup + V-ray Development


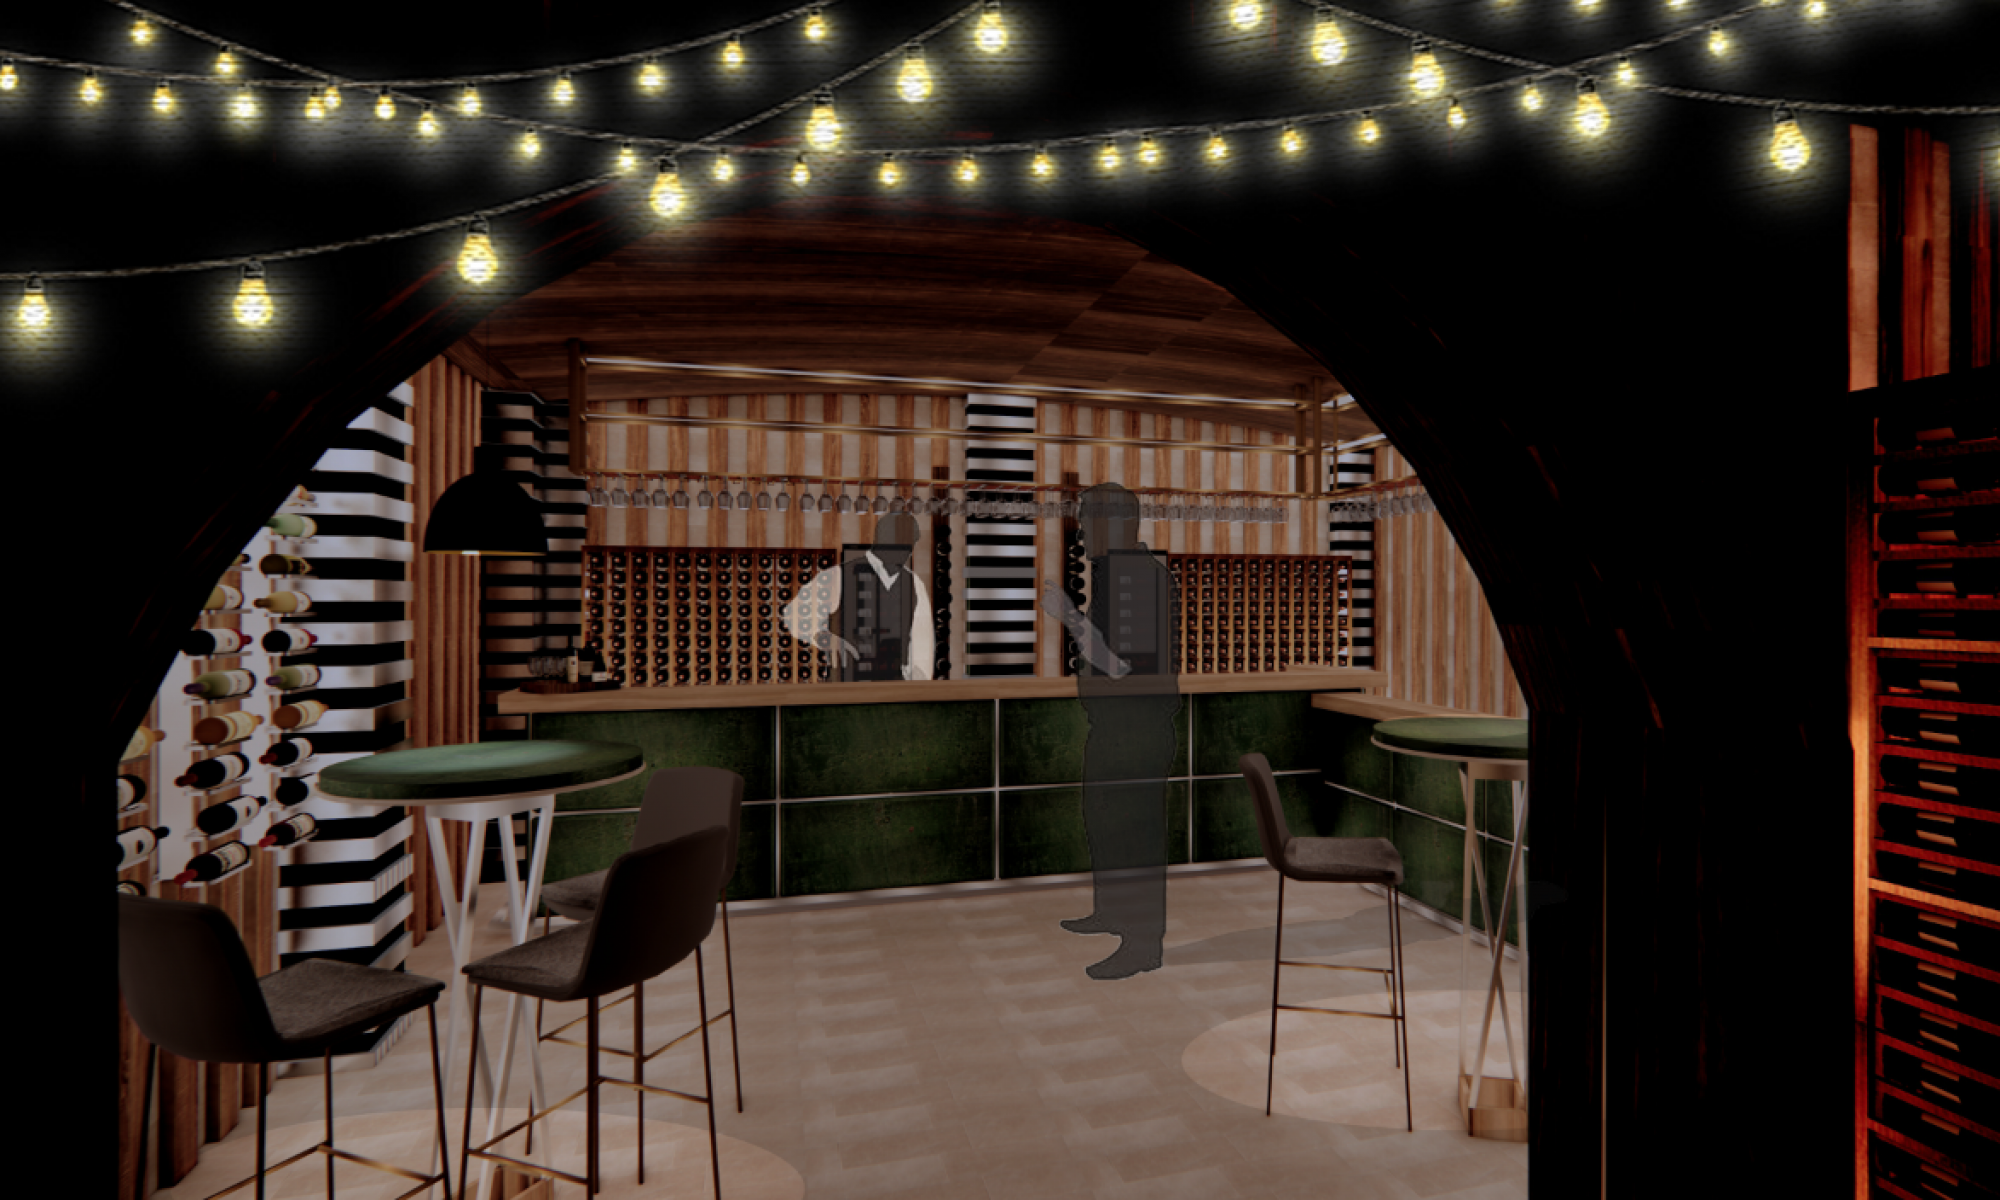
Sketchup and V-ray development (project 3)


Learning how to use V-ray and sketch up at the beginning of the year was very challenging for me as I had never used software like this before. I had previously used CAD within my A-levels however this did not provide me with any skills for these interior design software’s. Although I found it difficult at the start I have gradually increased my knowledge and understanding of them both which has allowed me to become more confident and successful in producing spaces for my projects. I have thoroughly enjoyed experimenting with V-Ray for this project as it has allowed me to see how I can adapt and change the lighting within a specific space to make it look aesthetically pleasing and stand out. I have also experimented with using different scenes, this has enabled me to produce renders of my interior spaces within different times of the day for example during the evening or morning. Spaces can look incredibly different during different parts of the day and I really liked using shadows and lighting to gain different perspectives of the space. When I first produced a series of V-ray renders for my ‘object display’ project I was unsure of how to enhance the properties and qualities of the materials within the SketchUp model; for example the texture of a surface. However, the ‘place to exist’ project has provided me with time to explore the different rendering tools on V-ray and after watching a variety of different YouTube tutorials on V-ray I was able to enhance the properties of my materials and furniture which make them look very aesthetically pleasing. I let my imagination run wild with this project and produced spaces which I would love to live and work in therefore using contemporary, stylish and minimalistic techniques.

SKETCHUP .pngsKETCHUP  2.png

Stitch Workshop:


Stitch:


During the stitch induction I learned the basic skills required to use a sewing machine and also learned how to manipulate fabric into different shapes to create different tones and textures within the fabric. I have used a sewing machine multiple times before this workshop and therefore I was relatively confident in setting up the sewing machine (e.g. changing the bobbin) and using the machine. However, this workshop has allowed me to become more confident in using the machines at uni more. I really enjoyed working with the sewing machines as they will allow me to produce intricate and detailed designs in the future which can be used to create soft furnishings such as cushions and sheets. These will increase the aesthetics of the interior as they can add colour, texture, and tone to a space. I am happy with my progress over the weeks in the stitch workshop as I have been able to carry out the tasks given efficiently.

Though everything within the stitch workshop was fine I found that the materials I chose to use frayed considerably which lead to me starting the project again with different fabric. This was beneficial as it showed me that I need to carefully pick the materials I want to use as their texture can hinder the process you are trying to carry out. Therefore it is essential that you pick a fabric which can withstand the techniques and details you will use. I would like to continue to use the stitch room to create detailed patterns that I could possibly use within my designs. This workshop has been really useful to update my knowledge with using a sewing machine but it has also allowed me to understand how to use the latest technology to create my own textiles pieces.Stitch .png


Fabric Workshop:


Fabric:


Within the fabric workshop I learned how to use a heat press to transfer my designs from paper onto fabric. This was incredibly exciting as I really enjoy working with fabric. For the first design I painted a floral/leaf pattern with 2 different shades of blue oil based paints. I really enjoyed painting my design and would like to continue using this for future projects. Once the paint had thoroughly dried I placed the paper between fabric and a scarp piece of paper to protect the fabric from burning. Once this was done I placed it under the heat press and held the plate down for 17 seconds. I then lifted the press up and separated the paper copy from the fabric. This process allowed me to successfully transfer the print onto fabric which enabled me to see that I can produce a variety of different soft furnishings from my own designs. These can then be used within my interiors which provide a personalised touch to my designs.

My first attempt at using the heat press:
Fabric 1 .png

The next fabric process I learned about was Batik. This is a technique of wax-resist dyeing applied to a whole cloth. This is done by drawing dots and lines of the resist with a spouted tool called a canting. Though this was interesting to learn about I personally did not enjoy this particular process. This is because I struggled wot produce an intricate drawing using the canting without spilling large amounts of wax onto the fabric. Therefore I would not use this particular technique for my interior furnishings as I believe you have to be incredibly skilled to complete this successfully. However, if I continue to practise and get help in understanding how to avoid the implications I came across then I could possibly regain my confidence in this area.

My first attempt at Batik:

 
Batik 1 .png

This is an image of a Batik print which has been done by a professional:
Batik 2.jpg

I really enjoyed learning about these new techniques and I think that I have developed as an interior designer as it has given me the knowledge and skills to produce my own patterns and prints for soft furnishings for my interior spaces.

Print Workshops:


Lino printing:


The print induction consisted of 2 days where I learned how to use the techniques of lino cut and screen printing to produce prints of art work. I found this incredibly interesting as I had never done it before, I really enjoyed the lino print due to the fact that you could gain intricate and detailed prints from using different cutting tools (gouge).

Linoleum is a versatile material which enabled me to create a variety of different shapes, it also meant that producing curves was incredibly fluid. Within this lesson I produced a floral print, which will be placed inside my interior space for my project a ‘place to exist’. Once I had cut out the piece I wanted to print I then chose to use blue pigment to print with, after the lino was completely inked from the roller I laid it onto the printing press and printed the pattern onto card. This is a very simple and affective process and allows you to produce a variety of different prints in a short space of time to a high quality. The prints were then left to dry on a drying rack. I believe that this process is incredibly good for interior design as it allows you to experiment with wallpaper, artwork and patterns which can be used within any interior space. This can be done by scanning the prints onto Photoshop and editing them to produce a surface pattern which will fit into your space. I think that I will continue using lino printing throughout my degree and career as an interior designer as it enables you to produce personalised prints; allowing you to produce a unique interior.

Lino Prints:

screen prints .png

Printing Press:                                                   Drying rack:

screen printing machiene .png               drying rack.png


Screen Printing


Screen printing is a printing technique where a mesh frame is used to transfer ink onto the cartridge paper.
On the second day of the print workshop we were introduced to screen printing. Again I have never done this before however I found the process incredibly interesting. I personally preferred lino printing to screen printing but I was able to gain skilful knowledge which I could potentially use for future projects. The first step in screen printing was to cut out a stencil of the print we wanted to produce. For my print I chose to draw a variety of leaves, this will be used as a print within my interior space for my current project. This was incredibly fiddly and I found that the paper was constantly ripping because it was so thin. However once I had produce my first stencil I placed it onto the mesh frame and then applied ink using a squeegee onto the stencil in one swift movement. This then allows the ink to flood through the stencil and transfer onto the card. Whilst the print was drying I used the jet wash to wash all of the ink which had saturated the mesh off and allowed to dry. The majority of my prints were successful however some of them did not obtain the quality I required. Therefore, this shows me that I need to continue practising this technique to ensure that my prints are produced to a higher standard.

I have thoroughly enjoyed learning about different print techniques and am confident to use them again as I believe I need more practise to ensure future prints are successful for my interior spaces. In the future I would like to experiment with more intricate designs other than floral patterns to widen my knowledge and experience within printing.


Rejecting the rules of beauty

During my 3rd session of Politic of beauty I learned about rejecting the rules of beauty. ‘The Abject’ was a phrase which I had not heard of before however I found out that it consists of what is unpleasant within the body e.g. blood, sweat, cellulite etc. and can be seen as pollution. All these things are considered not feminine and therefore will become the ‘abject’ of the body and should not be spoken about. For example when women had periods it was seen as dirty, un-lady like and therefore considered as an abject to women’s bodies. Alongside this I also learned about the ‘second wave feminism’ this consisted of upper class, white women reclaiming all the things that were considered taboo in feminism. For example instead of being ashamed of their period they were told to embrace it. Therefore encouraging women to not be ashamed of their bodies.


Gender Essentialism:


I also learned about gender essentialism, I had only heard this a few times but never really understood what the true meaning of it meant. It is the theory that there are certain innate, biologically or psychologically based features of gender which cause both men and women to act and behave in different ways. For example if we are born a girl we have to dress and behave according to societal standards. Therefore we are conditioned to shave all body hair off as it is considered not feminine and is not appealing to the opposite sex. In addition, if you are born a boy they you are programmed to think that you have to be manly and to keep your feelings to yourself. If a man cries it is considered weak as society has conditioned us to believe that men always have to be the alpha male.


Intersecting Beauty:


We live in a world with a variety of identities. Race and beauty creates a narrative around exotic beauty, therefore implying that if someone if of a different ethnicity they will be considered to have an exotic beauty due to the colour of their skin. Even though race within the beauty industry is much better there are still structural barriers, whiteness within the industry is still the majority which presents the inequality of race and therefore conforming to the incorrect ideology of what beauty consists of. In addition, cultural appropriation is becoming a big problem within the beauty industry, social media and society. This can be seen through the introduction of the braid bar which was set up in Selfridges, London. This lead to celebrities showcasing the braids to their fan base as a cool new trendy look however they were accused of creating cultural appropriation as they were stealing another cultures traditions and practises. Braids are a massive part of the black culture and can be dated back to a number of historical practises. Women wore the braids to gain independence and became a celebration of who they were and their identity. I learned that hundreds of years ago people could look at someone’s hairstyle and could determine where they were from what their status is within society, if they were married or a widow. Therefore implying that their hairstyles were a very big part of their culture and to not use the correct terms and names for the tradition is disrespecting their culture.

Rethinking the rules of beauty:


The modern Mannequin and Modelling:


During the 20th century the industrial revolution lead to society emphasising that peoples bodies mimicked that of machinery. This increased the idealisation of the industrial aesthetic, this included people to look a certain way in order to conform to society. The Modern Mannequin is a perfect example of how this affected people’s perceptions of the ideal body that would lead to beauty. Mannequins conform to a very specific aesthetic; slender, tall, slim and had a very angular and distinctive figure. This was how femininity was represented in the public sphere, in particular to white, affluent women and it continued to do so into the 21st century. The modern mannequin fitted perfectly into the cultural context within the 20th century causing the bodies to look like machinery which was developed in the industrial revolution therefore implying that women needed to change the way they looked for this new period in history. This shows that beauty was policed in a very specific way. I learned in this session that society was objectifying female bodies by producing their own ideology of what beauty consists of. In addition, I also learned that the modelling industry was inspired by the industrial theme; this is because the majority of models will walk and pose in a machine like way suggesting that the women figure should be rigid and angular.

Politcis of beauty (week 1)

In my first session of the politics of beauty constellation lectures I learned about ‘Policing the rules of beauty’. Beauty pageants can be seen as having a positive and negative effect on society, in some ways they can help provide body confidence the participants as they receive acknowledgement for their beauty therefore providing them with a sense of euphoria. On the other hand they can be susceptible to causing low self-esteem within society as it creates and advocates the ideal femininity and beauty within women; thereby suggesting that anything different to these stereotypes is classed as unworthy and inferior. I also learned that centauries ago if people were considered to be fatter they were seen as more affluent as they were able to afford food to survive from. Whereas in the 21st century in order to be considered part of the western beauty ideal you need to be slim and toned and therefore come from an affluent family. This is because they are able to afford plastic surgery in order to make themselves more beautiful. The western beauty ideal is something which has taken its toll on society and is constantly having negative impacts on people’s lives. It has become increasingly bad due to the fact that social media has enabled this toxicity into our periphery and allowing ourselves to think we are less beautiful.

Sketch Model and Technical drawings:


Sketch Model:


Producing a sketch model is incredibly important in understanding the main features of the building as well as acknowledging the amount of space available. It also enables me to place the specific rooms for the interior in the correct places alongside understanding scales and measurements in more depth. I used cardboard to construct my first sketch model, this is a very good material as it can easily be cut using a scalpel which allows me to obtain crisp edges for the building. Once all the components where cut out I assembled them using a glue gun, this was the easiest way to attach the cardboard to each other and also took the least time. I believe that I am starting to understand how to produce successful models for my projects as I can efficiently identify the correct scales to use in order to create an accurate model. However, I do think that I need to practise this more frequently in order to truly understand how to successfully produce a model to a high standard and quality.


Technical Drawings:


Alongside model making I have been developing my 3D sketches and technical drawings. I find sketching the easiest way to present my ideas, completing a-level product design has enabled me to create neat and accurate sketches which allow me ideas to be easily understood. After my review on Monday I have decided to continue developing my sketches as my design has recently been adapted, by improving the structure I can produce not only a better interior space but a more efficient architectural structure. I have also been designing the features I would like to be placed within the interior space by drawing them, these can then easily be sketched into sketch up. They can then be placed into the 3d model I have created on sketch up. I have really enjoyed this project so far as I have been able to express my own unique style into the building, this has been incredibly exciting. I would like to improve my skills in model making as well as technical drawing to ensure that I am equipped with the best skills required to become an interior designer.

Sketch up – place to exist


SKECTH UP: week 1


I found producing the plans, sections and elevations incredibly easy for this project as I understand how to draw them to the correct scale and therefore enabled me to complete these relatively quickly. Once these were completed I started designing the building on sketch up, to do this I took the measurements from the plans and placed them onto sketch up which enabled me to produce the main body of the building. I think that I have successfully developed my skills within sketch up over the past few projects I have completed which has allowed me to become more confident with the tools used on the software to produce different elements of the building.

I am very happy with my progress as I had not used the software before coming to uni however I believe that I can further improve my ability on sketch up as I am still unsure with some of the processes therefore I will need to continue to practise these skills. During the sketch up sessions I have been able to understand how to produce my own furniture which allows me house to become personalised and unique. One of the first pieces of furniture I created was a personalised kitchen unit, this incorporated the main materials and colours I wanted to use; including copper, wood painted in a grey polish and stainless steel. All these materials complement each other and therefore I wanted to focus on using them within my building. As part of my research I created mood boards and paint samples which ideally would fit perfectly into the interior I wanted to produce. Having a great understanding into how I want my interior spaces to look like enabled me to easily recreate those spaces within the building on sketch up.

Mood boards are a great way to express your style and it has helped me to understand the style which is most preferable to me in order to produce the perfect environment for me to live and work.


SKETCH UP MODEL: (week1)


skecth up model 2.png     skecthup model .png


MOOD BOARD:


MOOD BOARD.png       WALL COLOUR SAMPLES

Place to exist


WEEK 1:


Our next project involved designing and creating a place to exist. This is a place where I can live, work, play, sleep and eat, therefore function as both a private house and a public space which allows my business to grow. Alongside a workspace I will need to design a display space which will showcase all the objects I have produced for the public to admire and purchase. This brief allowed us to choose our own location for our building however it must abide by 2 rules; has to be situated on a beach with a cliff/mountainous setting behind it. I chose to place my building in Dorset, specifically in Durdle Door. This is a location which I am very familiar with as I live within that area, this made it easier for me to analyse the location, sun path, entry and circulation as I know the location well. For this project my workshop and display space will be used to produce sea glass jewellery, I found this fitting for this brief as the location I have chosen is known for having large amounts of sea glass and therefore if perfect for the products I want to produce.

host building analysis   host building analysis 2

Once I had chosen a location I completed a host building analysis which allowed me to identify the opportunities and restrictions of the building as well as enabling me to identify the main features of the building. I found that completing the host building analysis was easier and more efficient for this project as I understood the requirements needed to complete one successfully. Alongside this we had to produce an accommodation schedule, this is something that I wasn’t familiar with at the start however once I understood the concept of it I was able to produce one relatively quickly. This helped me to identify what I would need within each space in order to work and live within the building efficiently. (E.g. work bench for the workshop) I believe that I have worked to the best of my ability within this first section of this project and therefore has provided me with a good understanding of what the host building has to offer.


BUBBLE DIAGRAMS:


I was particularly inspired by a new technique I learned within this project, this was producing bubble diagrams to allocate different spaces within the building and provides a more detailed analysis of the entry and circulation between different rooms. I found this incredibly useful as it enabled me to visualise where I should put each room and also allowed me to experiment with different layouts. These can then be placed into zoned diagrams, these are when the bubble diagrams are placed within the scaled plan of the building therefore giving me a better idea of what the space with eventually look like.

bubble diagrams

Design a site like this with WordPress.com
Get started